


As JavaScript continues to quickly spread across the development landscape, Electron has emerged as the leading foundation for building cross-platform desktop applications in JavaScript. It was originally created by Github as part of their popular Atom code editor. It now powers a wide variety of production desktop applications that work in Mac, Windows, and Linux. When used along with React Native, the dream of a (mostly) integrated cross-platform codebase is finally here!
As web developers begin excursions into other platforms, we often run into new challenges that we haven’t been faced with in traditional client/server environments. We’ll be writing a lot here about our discoveries along the way. The topic I’ll cover today is OAuth2 authentication with Google.
This should be easy, right?
There are plenty of libraries and examples to get the modern front end developer up and running with Google authentication, including ready-made libraries intended to drop into any existing site. Unfortunately, when trying to use those solutions with Electron, you’ll run into a big hurdle — the “file://” protocol. As users of Phonegap and similar solutions discovered long ago, OAuth does not allow the callback url to use the “file” protocol.
Fortunately, there are a few ways to work around this. My favorite way is to register as an iOS app and retrieve the access token from within the app — no server required.
Getting Credentials
The procedure is documented by google here: Using OAuth 2.0 for Mobile and Desktop Applications
To get started, visit the Google Cloud Console and set up a project if you don’t have one already. Navigate to the API Manager section, and the Credentials tab. Click on “New Credentials”, and select “OAuth Client ID”.
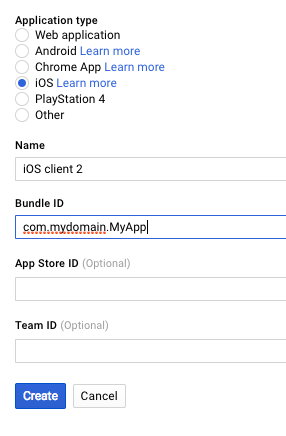
The Bundle ID will also be used in your fake redirect url, as described in the Google doc.
Launching an Auth Window
Now that you have a client ID, it’s time to make use of it in the application. To do this, we harness Electron’s remote module to launch a new `BrowserWindow` and watch it closely for redirects. We can parse the destination url for the tokens we need to authenticate. This approach is borrowed from Emmanouil Konstantinidis and his blog post about Github authentication.
To start out, we set a few URL constants and a top-level function to manage the authentication process.
import {parse} from 'url'
import {remote} from 'electron'
import axios from 'axios'
import qs from 'qs'

const GOOGLE_AUTHORIZATION_URL = 'https://accounts.google.com/o/oauth2/v2/auth'
const GOOGLE_TOKEN_URL = 'https://www.googleapis.com/oauth2/v4/token'
const GOOGLE_PROFILE_URL = 'https://www.googleapis.com/userinfo/v2/me'

export async function googleSignIn () {
  const code = await signInWithPopup()
  const tokens = await fetchAccessTokens(code)
  const {id, email, name} = await fetchGoogleProfile(tokens.access_token)
  const providerUser = {
    uid: id,
    email,
    displayName: name,
    idToken: tokens.id_token,
  }

  return mySignInFunction(providerUser)
}
he mySignInFunction reference at the bottom of the function should be replaced with whatever function you use to handle the provider user after authenticating, which usually involves calling out to an API endpoint or a 3rd-party service like Firebase to retrieve user profile data.
Next, let’s work through opening the window and watching it for redirects. With this, we can “spy” on the authentication process going on inside the window, and handle the authorization code when it’s received.
export function signInWithPopup () {
  return new Promise((resolve, reject) => {
    const authWindow = new remote.BrowserWindow({
      width: 500,
      height: 600,
      show: true,
    })

    // TODO: Generate and validate PKCE code_challenge value
    const urlParams = {
      response_type: 'code',
      redirect_uri: GOOGLE_REDIRECT_URI,
      client_id: GOOGLE_CLIENT_ID,
      scope: 'profile email',
    }
    const authUrl = `${GOOGLE_AUTHORIZATION_URL}?${qs.stringify(urlParams)}`

    function handleNavigation (url) {
      // ...
    }

    authWindow.on('closed', () => {
      // TODO: Handle this smoothly
      throw new Error('Auth window was closed by user')
    })

    authWindow.webContents.on('will-navigate', (event, url) => {
      handleNavigation(url)
    })

    authWindow.webContents.on('did-get-redirect-request', (event, oldUrl, newUrl) => {
      handleNavigation(newUrl)
    })

    authWindow.loadURL(authUrl)
  })
}
I’ve hidden the contents of handleNavigation for now — we’ll worry about that in a moment. This code creates a new promise, and then opens a new BrowserWindow using the remote module to communicate with the main process. A GET request is constructed, and the authWindow.loadURL call at the bottom gets the request started.
You’ll see I have a couple of TODO items in this code. I’ll update this post as I implement these portions later, but I’d love a contribution if you’d like to fork the gist!
Handling Successful Authentication
The event handlers watch for navigation and redirects, and uses handleNavigation to respond to them.
    function handleNavigation (url) {
      const query = parse(url, true).query
      if (query) {
        if (query.error) {
          reject(new Error(`There was an error: ${query.error}`))
        } else if (query.code) {
          // Login is complete
          authWindow.removeAllListeners('closed')
          setImmediate(() => authWindow.close())

          // This is the authorization code we need to request tokens
          resolve(query.code)
        }
      }
    }
The handleNavigation function takes the url from the navigation events and checks it for error or code parameters. These parameters are how Google communicates with the redirect URL. If there is a code, then authentication was successful! This is the authorization code you need to request more codes from google — the access and refresh tokens.
export async function fetchAccessTokens (code) {
  const response = await axios.post(GOOGLE_TOKEN_URL, qs.stringify({
    code,
    client_id: GOOGLE_CLIENT_ID,
    redirect_uri: GOOGLE_REDIRECT_URI,
    grant_type: 'authorization_code',
  }), {
    headers: {
      'Content-Type': 'application/x-www-form-urlencoded',
    },
  })
  return response.data
}
I’m using axios to manage the Ajax request here. Now that we have the access token, we can get the basic profile details.
export async function fetchGoogleProfile (accessToken) {
  const response = await axios.get(GOOGLE_PROFILE_URL, {
    headers: {
      'Content-Type': 'application/json',
      'Authorization': `Bearer ${accessToken}`,
    },
  })
  return response.data
}
With that, we’ve got the profile data we need to pass to mySignInFunction in the googleSignIn function above!
Electron Ahoy!
This is one of the few rough spots I’ve run into in my journey with Electron so far. Everything else has been rather smooth and exciting to work with. It is such a polished platform, with so many little details already handled for you. The ecosystem around it is growing rapidly, so keep an eye on awesome-electron for more resources!
Expect a lot more in the days ahead as I build out a universal application structure that shares a common core across React, Electron, and React Native. Stay tuned!